Safe Fueling Procedures

Originally published 09/06/2016

The hazards involved with fueling equipment on a construction site include gas and fuel fires, spills, vapors and slips, trips and falls. Here are some precautions you should take to prevent a fueling accident:

Fueling Station

  • Keep a spill kit available, and train workers to use it.
  • Keep a fire extinguisher at the fueling station.
  • Set up fueling stations in well-ventilated areas.
  • Maintain all pumps, hoses and nozzles in accordance with manufacturer’s specifications.

Fueling Your Vehicle

  • Always concentrate on the task at hand.
  • Do not use electronic devices, such as cell phones while fueling, because a spark could ignite a fire.
  • Turn off the vehicle’s engine.
  • Before dispensing fuel into your vehicle, touch a metal part of your vehicle that is not close to the fuel tank. This helps dissipate any static buildup your body created when you slid out of your vehicle.
  • Never smoke while fueling. Also, make certain there are no other potential sources of ignition, such as open flames or spark-producing equipment operating in the area.
  • Do not overfill the fuel tank.
  • Allow for fuel expansion on hot days.
  • If you are refueling portable equipment such as lawn mowers, generators, chain saws, or anything else with a fuel-powered engine, let the engine cool down before you add fuel to the tank. Spilling fuel on a hot motor instantly creates a cloud of highly flammable vapor, which can easily catch fire or explode.
  • Use only safety cans or other approved portable fuel containers to transport or transfer fuel. Unapproved containers can leak, spill fuel or rupture.
  • Never dispense fuel into a can or other portable container while it is sitting in your vehicle or truck bed.
  • If you have a fuel spill:
    • Clean it up immediately using the appropriate spill kit.
    • Remove any clothing that has absorbed gasoline and thoroughly wash the fuel from your body.

Fuels can be highly flammable and, if handled improperly, these substances can make fueling equipment a dangerous task. Be aware of the hazards and follow the prevention steps to avoid an incident on your site.

Download the recording form here.

Care and Maintenance of Safety Vests

Originally published Sept. 13, 2016

Safety vests are designed to make workers visible to traffic and machine operators under any conditions. Vests must meet ANSI’s performance class 2 or 3 requirements. You must wear it if you are:

  • Part of a highway construction or maintenance crew (this includes flaggers);
  • An inspector;
  • Engineering personnel;
  • Part of a survey crew or utility crew; or
  • A responder.

If maintained properly, a vest that is worn on a daily basis has a service life expectancy of approximately six months. A vest not worn daily could be functional up to three years. Do not neglect washing your vest. Dirt can diminish the intensity of the florescent color. You want the color to be as visible as possible.

One manufacturer suggests machine laundering with like colors, in cold water, on the delicate cycle using a mild detergent. Do not use bleach or fabric softener. If possible, wash the garment inside out. Following these instructions will help protect the reflective tape.

Line drying your vest will also extend the life of the reflective tape. If you choose to machine dry, remove the vest from the dyer immediately. Do not let it sit with other hot clothes next to the dryer’s drum. This could also damage the reflective tape.

Your safety vest should be replaced when it becomes faded, torn, dirty, soiled, worn or defaced, or if it is not visible at 1,000 feet day or night. Factors that may cause your vest to wear out more quickly, depending on the amount of use, include:

  • Higher elevations due to increased ultra-violet rays;
  • Hot climates;
  • The types of work you are doing (some jobs are more dirty or strenuous and could be more likely to lead to soiling or tears); and
  • Care and maintenance of your vest.

When it’s time to replace your safety vest, notify your safety compliance officer or supervisor and request a replacement.

The proper care and maintenance of your vest will ensure that you are seen and help you stay safe while on the job. Launder your vest according to the manufacturer’s instructions, and replace it as soon as it is no longer appropriately visible. Your life may depend on it.

Download the recording form here.

Safe Use of Cut Saws

Originally published on July 19, 2016

Construction workers often need to use cut saws to cut pipe, concrete, brick or block. Kickback – when the saw jumps back toward the operator – is the primary cause of serious injury when using a cut saw. Because cut saws are very dangerous, operators must have the proper instruction and training, and be regularly assessed to make sure they know how to safely operate the saw.

You should be in good physical shape and well rested if you are going to use a cut saw. Fatigue can cause you to lose control of the saw. Before you use the saw, familiarize yourself with the manufacturer’s instructions, and never use an abrasive blade on objects for which it was not intended.

When using the saw, hold it firmly with both hands, maintain good balance and footing at all times and avoid using the saw in awkward positions. It is important to position the saw in such a way that you are not bending over or standing directly behind the blade, especially when the guard is pulled back towards the top of the blade. Never overreach or hold the saw above the line of the shoulder.

A kickback can be caused by using the upper part of the cutting blade, or if the wheel is pinched at the front. It can also happen when a cut is interrupted, or when putting the blade back into a cut that has already been started. Material that sags or moves during a cut could bind the wheel or cause a kickback. Make sure that the object you are cutting is fully supported, secured so it cannot roll or slip and does not vibrate. Wet cutting not only helps keep the abrasive cool and reduce dust, but in a pinch situation, the water can act as a lubricant and reduce the energy of reactive forces. The saw’s guard should be designed to prevent cutting with the front and upper quadrant of the blade. You should never pull the guard beyond the limit stop.

A blade lock in can be caused when the work piece shifts, pinching the blade. Make sure that the work piece is clamped so that this can’t happen. You can also cause a lock in if you try to cut too deeply too quickly, or try to cut on a radius. These can lock the blade or cause the diamond segment to pop off. It would be safer to make a shallow guide cut, then come back for a deeper cut.

General safety tips for using a cut saw include the following:

  • Inspect the saw for damage before use, and make sure the guard is in place and secure. Do not use a wheel that has been dropped.
  • Wear the proper personal protective equipment – i.e. eye/face protection, non-slip gloves, ear protection, hard hat, long-sleeved shirt and long pants (but they should not be loose fitting), and a respirator when dusty conditions exist.
  • Fuel the saw outdoors in a well-ventilated area while the engine is cool.
  • Establish a safe work zone to ensure that no one is exposed to any risks because they are too close to the saw while it’s in use.
  • When finished using the saw, turn off the engine and let the wheel stop rotating before carrying the saw or setting it down.
  • When carrying the saw, be sure the hot muffler is on the side away from your body.
  • Store the saw in a cool, dry place. Abrasives are heat and moisture sensitive.

Cut saws are valuable tools in construction, but they can also be dangerous. Safety is one of the most important issues you need to consider before picking up a saw.

Download a recording form here.

Job Hazard Analysis

Originally published July 27, 2016

Construction sites are fertile ground for hazards. Many workers are injured or killed at the workplace every day in the United States. You can help prevent workplace injuries, illnesses and fatalities by looking at your workplace operations and identifying possible hazards and eliminating them. A job hazard analysis is an exercise in detective work. Your goal will be to discover what can go wrong, what the consequences could be, how did the hazard arise, what were other contributing factors and how likely is it that exposure to the hazard could actually result in injury.

Hazards exist in four areas:

  • People – Identify improperly trained or poorly supervised individuals, those that seem distracted and are not paying attention to their surroundings, employees not wearing the assigned or appropriate safety equipment and those not following safe work practices.
  • Equipment – Poorly maintained or uninspected equipment, unguarded equipment or improper or worn out equipment for the task at hand.
  • Materials – Flammable materials or those that require special storage and handling, chemicals that are volatile or dangerous when inhaled or that come in contact with skin and materials that are improperly stored.
  • Environment – Insufficient lighting, loud or constant sounds, traffic in and around work zones and inclement weather. Also identify any toxic substance produced by living things such as bacteria, viruses and fungi that can cause illness or disease in humans.

A good safety system will include a hazard assessment process for all of these areas, provide avenues for employees to report injuries and near misses, and be proactive in addressing hazards that are identified.

  • All employees should be involved in the hazard analysis process. Employees at each work level have a unique understanding of the job. A buy-in from employees will help minimize oversights, ensure a quality analysis and help provide solutions to hazards that are discovered.
  • Review your company’s accident history. This would include accidents and occupational illnesses that needed treatment, losses that required repair or replacement and any near misses where loss did not occur, but could have. These events are indicators that the existing hazard controls (if any) may not be adequate and deserve more scrutiny.
  • Conduct a preliminary job review. Discuss your findings with your employees and brainstorm with them for ideas to eliminate or control those hazards. If any hazards exist that pose an immediate danger to an employee’s life or health, take immediate actions to protect the worker. Problems that can be corrected easily, should be corrected as soon as possible.
  • List, rank and set priorities for hazardous jobs. List jobs with hazards that present unacceptable risks, based on those most likely to occur and with the most severe consequences. These jobs should be your first priority.

Hazard assessments should be done on a regular basis. Don’t assume that because you’ve done it once, everything is in order. Worksites are constantly changing, and safety hazards are bound to appear at various times throughout a given job.

Download the recording form here.

Working Safely in Windy Conditions

Strong winds can occur any time of the year. To prevent unnecessary workplace injuries and tragedies, it’s important that construction workers know the appropriate measures to take to ensure their safety and that of others on the work site.

Working at heights is especially risky in high winds because the lack of shelter exposes workers to stronger gusts that can throw the worker off balance. The further the distance to the ground, the greater the likelihood that a fall will be fatal.

When working above the ground, unsupported structures can collapse. High winds can pick up sparks from fires or blow tools, loose materials and debris around, endangering workers as well as bystanders and pedestrians.

The following guidelines can help ensure the safety of those on your work site.

  1. Monitor weather conditions continuously. Do not schedule work at elevations on days where high winds are forecast.
  2. Support partially built structures regardless of the weather conditions and make sure walls are adequately braced.
  3. Secure scaffolding and other temporary structures so they cannot be blown over.
  4. Secure traffic control devices so they don’t blow over.
  5. Keep a clean work site. Don’t leave cones, signage and other loose materials laying around and unsecured. A gust of wind could pick up a scrap of material and send it flying.
  6. Wear eye protection to keep dust, debris and other foreign particles from blowing into the eyes.
  7. Make sure that your hard hat is securely fastened and cannot be blown off your head.
  8. Use extreme caution when handling large signs and stop/slop paddles, as these can act as a sail.
  9. Use taglines when hoisting loads with large flat surfaces.
  10. Cease all crane operations until wind speeds return to acceptable levels.

Weather is a major factor when determining when a task can or cannot be done on a construction site. When high winds are going to be present, plan accordingly. There will be some tasks you will need to avoid all together, and others that can be done if extra safeguards are put into place.


Download the recording form here.

Call Before You Dig

According to Indiana Code 8-1-26, you must call the Indiana Underground Plant Protection Service Call Before You Dig Center before beginning any excavation project. The number is 811.

OSHA 1926 Standard for Construction, Subpart B, also requires that you determine the estimated location of utility installations, such as sewer, telephone, fuel, electric water lines or any other underground installation that may be encountered before opening an excavation.

Premark your location with white paint, flags or both. Call the 811 number at least two full working days before you dig. Provide the center with the location of the site. Be specific. The center will give you a reference number that is proof of your call. After making the call to 811, you must wait 48 hours before beginning work to ensure that all utility companies have had time to respond.

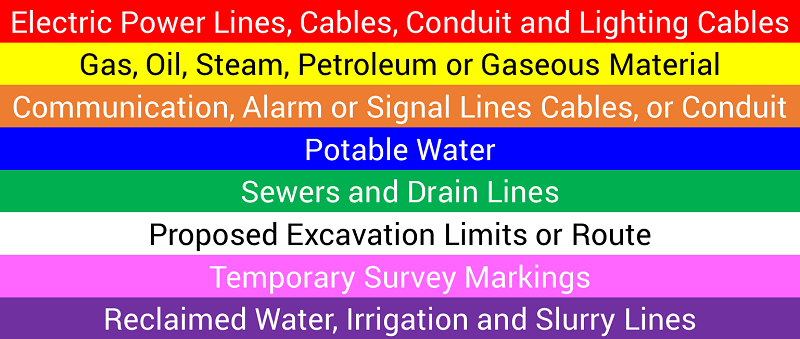
When utility locators respond to your request, they will mark the utilities with paint or flags. Below are the colors that may be used for marking and what they represent:

callbeforeyoudig

If weather, lawn mowing, traffic or other activities cause you to lose your marks, notify Indiana 811 immediately and have your reference number ready to request a remark. Do not refresh the marks with your own paint. An additional notice of two full working days is required for the remark.

Indiana law requires that the excavator observe the tolerance zone during excavation. That is an area equal to the width of the underground facility plus 24 inches on each side of the buried utility. Excavate by hand, if necessary, until the utility is visibly located. Be sure someone other than the equipment operator, i.e. the spotter, is there to look for any sign of the underground facility.

For your safety, don’t assume that a pipeline or cable runs straight between two markers. Don’t assume that an underground facility is the same depth throughout the excavation area. Don’t bend over a gas line or self-repair a line. And don’t assume all utilities have responded to your request. Assess the proposed excavation area for indications of unmarked facilities.

If your job will last longer than 20 calendar days, you must renew your locate request at least two full working days before it expires.

When you call before you dig, you are helping to protect yourself, your fellow workers and the public, as well as the environment.

Download the recording form here.